ZFS Boot Mirrors on Proxmox 8 for the Homelab - Part 1
· 9 min readZFS boot mirrors are the minimum viable resilience for any Proxmox node. The cost is one extra drive per node. The alternative is a full reinstall from scratch when a boot drive fails — a procedure I’ve documented in Part 2 because I’ve had to do it. Having set up email alerting for ZFS failures, I’ve now dealt with this recovery procedure enough times — and made enough mistakes — that it’s worth writing down properly.
This is the procedure for replacing a failed drive in a Proxmox ZFS boot mirror. Part 2 covers the emergency recovery when both drives fail simultaneously. Part 3 covers the planned migration to smaller SSDs with a UEFI upgrade.
Why ZFS Boot Mirrors Matter
A Proxmox node with a degraded boot mirror keeps running. The cluster keeps running. You get an email, you order a drive, and you fix it on your schedule rather than in a panic. That’s the entire value proposition — it turns a potential emergency into a planned maintenance task.
In my six-node homelab cluster, I’ve had five of twelve boot drives fail over the years. Every single one was caught by the mirror before it became an outage. See Monitoring ZFS Boot Mirror Health in Proxmox 8 Clusters for the full cluster health picture and SMART monitoring scripts.
Step 0: Confirm the Drive Is Actually Bad
Before pulling anything, verify the drive is genuinely failed and not just having a bad day. Old hardware occasionally throws transient errors.
zpool clear rpool
zpool scrub rpool
zpool status
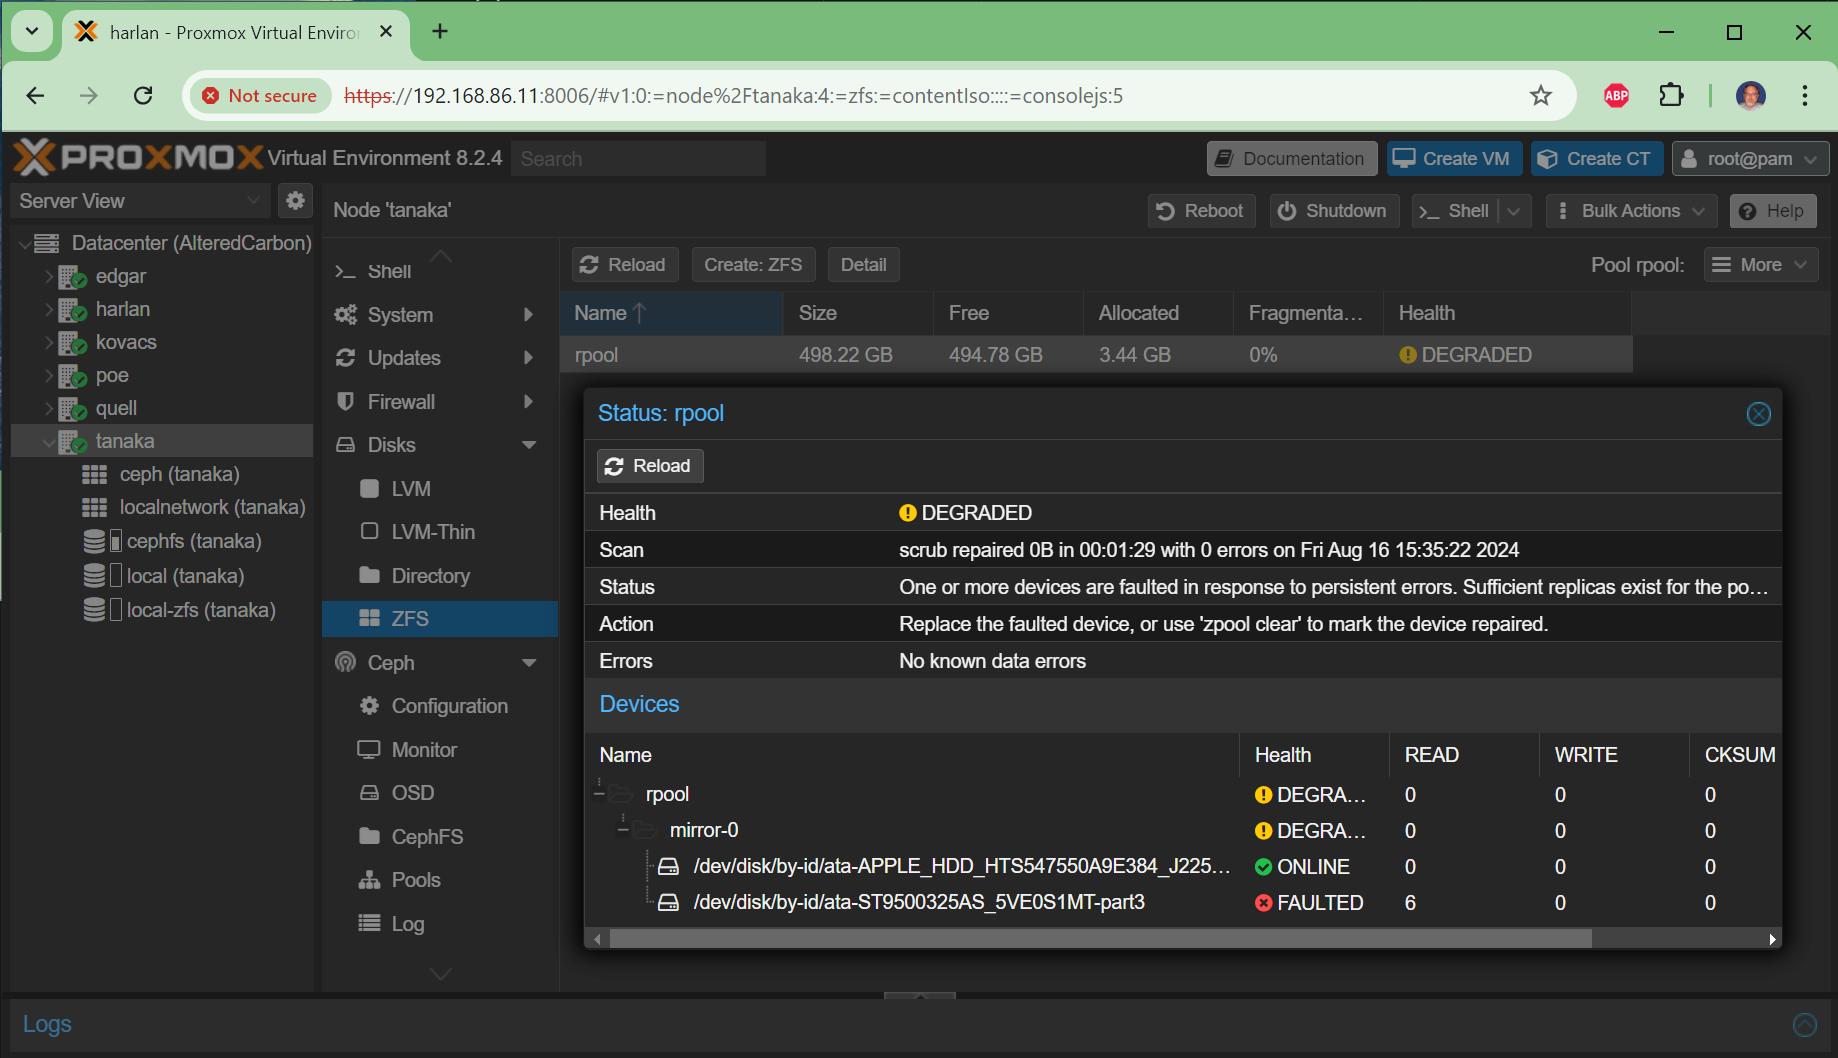
Click to expand — example console session confirming a bad drive on tanaka
root@tanaka:~# zpool status
  pool: rpool
state: DEGRADED
status: One or more devices are faulted in response to persistent errors.
action: Replace the faulted device, or use 'zpool clear' to mark the device repaired.
  scan: scrub repaired 0B in 00:01:29 with 0 errors on Fri Aug 16 15:35:22 2024
config:
        NAME                                                    STATE     READ WRITE CKSUM
        rpool                                                   DEGRADED     0     0     0
          mirror-0                                              DEGRADED     0     0     0
            ata-APPLE_HDD_HTS547550A9E384_J2250055GMJ83C-part3  ONLINE       0     0     0
            ata-ST9500325AS_5VE0S1MT-part3                      FAULTED      6     0     0  too many errors
root@tanaka:~# zpool clear rpool
root@tanaka:~# zpool scrub rpool
root@tanaka:~# zpool status
  pool: rpool
state: DEGRADED
        NAME                                                    STATE     READ WRITE CKSUM
        rpool                                                   DEGRADED     0     0     0
          mirror-0                                              DEGRADED     0     0     0
            ata-APPLE_HDD_HTS547550A9E384_J2250055GMJ83C-part3  ONLINE       0     0     0
            ata-ST9500325AS_5VE0S1MT-part3                      FAULTED      6     0     0  too many errors
Still FAULTED after clear and scrub — that drive is not coming back.
You may also receive an email alert from ZFS that looks like this:
ZFS has finished a resilver:
   eid: 19
 class: resilver_finish
  host: tanaka
  pool: rpool
 state: ONLINE
status: One or more devices are faulted in response to persistent errors.
config:
        NAME                                                    STATE     READ WRITE CKSUM
        rpool                                                   ONLINE       0     0     0
          mirror-0                                              ONLINE       0     0     0
            ata-APPLE_HDD_HTS547550A9E384_J2250055GMJ83C-part3  ONLINE       0     0     0
            ata-ST9500325AS_5VE0S1MT-part3                      FAULTED      6   294     3  too many errors
The Replacement Procedure
The steps at a high level:
- Copy the partition structure from the working boot disk to the new disk
- Replace the failed disk in the ZFS rpool mirror
- Verify resilvering starts
- Check proxmox-boot-tool status — clean up stale ESP entries
- Initialize the new disk for Proxmox booting
- Verify both disks are bootable
- Run a ZFS scrub and verify no errors
Complete Working Example — edgar node
Here is a full console session replacing a failed drive on edgar. The new replacement drive was a Toshiba MQ01ABD100 (same size as the original).
root@edgar:~# zpool status
  pool: rpool
 state: DEGRADED
status: One or more devices could not be used because the label is missing or invalid.
action: Replace the device using 'zpool replace'.
config:
        NAME                                 STATE     READ WRITE CKSUM
        rpool                                DEGRADED     0     0     0
          mirror-0                           DEGRADED     0     0     0
            ata-ST31000524AS_5VPD6EX2-part3  ONLINE       0     0     0
            12573010284538016996             UNAVAIL      0     0     0  was /dev/disk/by-id/ata-ST31000528AS_5VP07Z06-part3
Identify the disks — the good boot disk and the new replacement:
root@edgar:~# fdisk -l
Disk /dev/sda: 931.51 GiB   # ST31000524AS — good boot disk
Disk /dev/sdb: 931.51 GiB   # TOSHIBA MQ01ABD100 — new replacement (no partitions yet)
Copy the partition structure from the good disk to the new disk:
root@edgar:~# sfdisk -d /dev/sda | sfdisk /dev/sdb
Find the new disk’s by-id path:
root@edgar:~# ls /dev/disk/by-id/*-part3
/dev/disk/by-id/ata-ST31000524AS_5VPD6EX2-part3
/dev/disk/by-id/ata-TOSHIBA_MQ01ABD100_96EOC9BST-part3
Replace the failed disk in the ZFS mirror:
root@edgar:~# zpool replace rpool \
  /dev/disk/by-id/ata-ST31000528AS_5VP07Z06-part3 \
  /dev/disk/by-id/ata-TOSHIBA_MQ01ABD100_96EOC9BST-part3
Verify resilvering starts:
root@edgar:~# zpool status
  pool: rpool
 state: DEGRADED
status: One or more devices is currently being resilvered.
  scan: resilver in progress since Tue Feb 25 15:33:38 2025
        6.73G / 6.73G scanned, 40.7M / 6.73G issued at 40.7M/s
        25.2M resilvered, 0.59% done, 00:02:48 to go
config:
        NAME                                          STATE     READ WRITE CKSUM
        rpool                                         DEGRADED     0     0     0
          mirror-0                                    DEGRADED     0     0     0
            ata-ST31000524AS_5VPD6EX2-part3           ONLINE       0     0     0
            replacing-1                               DEGRADED     0     0     0
              12573010284538016996                    UNAVAIL      0     0     0
              ata-TOSHIBA_MQ01ABD100_96EOC9BST-part3  ONLINE       0     0     0  (resilvering)
While resilvering, fix the Proxmox boot tool — it still has the old disk’s UUID registered:
root@edgar:~# proxmox-boot-tool status
System currently booted with legacy bios
EEC6-6947 is configured with: grub (versions: 6.8.12-1-pve, 6.8.12-8-pve)
WARN: /dev/disk/by-uuid/EEC8-2CDA does not exist - clean '/etc/kernel/proxmox-boot-uuids'! - skipping

root@edgar:~# proxmox-boot-tool clean
Checking whether ESP 'EEC6-6947' exists.. Found!
Checking whether ESP 'EEC8-2CDA' exists.. Not found!
Sorting and removing duplicate ESPs..
Format the new disk’s EFI partition and initialize it for Proxmox booting:
root@edgar:~# proxmox-boot-tool format /dev/disk/by-id/ata-TOSHIBA_MQ01ABD100_96EOC9BST-part2
Formatting '/dev/disk/by-id/ata-TOSHIBA_MQ01ABD100_96EOC9BST-part2' as vfat..
Done.

root@edgar:~# proxmox-boot-tool init /dev/disk/by-id/ata-TOSHIBA_MQ01ABD100_96EOC9BST-part2 grub
Installing grub i386-pc target..
Installation finished. No error reported.
Copying and configuring kernels on /dev/disk/by-uuid/A4AA-5148
        Copying kernel 6.8.12-1-pve
        Copying kernel 6.8.12-8-pve
done
Copying and configuring kernels on /dev/disk/by-uuid/EEC6-6947
        Copying kernel 6.8.12-1-pve
        Copying kernel 6.8.12-8-pve
done
Verify the resilver completed and both disks are healthy:
root@edgar:~# zpool status -v
  pool: rpool
 state: ONLINE
  scan: resilvered 6.92G in 00:07:21 with 0 errors on Tue Feb 25 15:40:59 2025
config:
        NAME                                        STATE     READ WRITE CKSUM
        rpool                                       ONLINE       0     0     0
          mirror-0                                  ONLINE       0     0     0
            ata-ST31000524AS_5VPD6EX2-part3         ONLINE       0     0     0
            ata-TOSHIBA_MQ01ABD100_96EOC9BST-part3  ONLINE       0     0     0
Run a scrub to verify data integrity:
root@edgar:~# zpool scrub rpool
root@edgar:~# zpool status -v
  pool: rpool
 state: ONLINE
  scan: scrub repaired 0B in 00:04:06 with 0 errors on Tue Feb 25 15:46:08 2025
Verify both disks are registered as Proxmox boot targets:
root@edgar:~# proxmox-boot-tool status
System currently booted with legacy bios
A4AA-5148 is configured with: grub (versions: 6.8.12-1-pve, 6.8.12-8-pve)
EEC6-6947 is configured with: grub (versions: 6.8.12-1-pve, 6.8.12-8-pve)
Both disks listed — the mirror is fully restored.
Common Mistakes
Mistake 1: zpool detach instead of zpool replace
This is the most common error and I made it myself on tanaka. After physically removing the bad drive, I ran:
# WRONG — this removes the disk from the mirror entirely
zpool detach rpool <failed-disk-id>
This leaves you with a single-disk pool — no mirror at all. The correct command is zpool replace, which keeps the mirror intact and starts resilvering immediately when the new disk is added.
If you’ve already made this mistake, you can recover with zpool attach:
root@tanaka:~# zpool attach rpool \
  ata-APPLE_HDD_HTS547550A9E384_J2250055GMJ83C-part3 \
  /dev/disk/by-id/ata-ST3500418AS_5VMQF6GN-part3

root@tanaka:~# zpool status -v
  pool: rpool
 state: ONLINE
status: One or more devices is currently being resilvered.
  scan: resilver in progress since Thu Aug 22 22:57:00 2024
config:
        NAME                                                    STATE     READ WRITE CKSUM
        rpool                                                   ONLINE       0     0     0
          mirror-4                                              ONLINE       0     0     0
            ata-APPLE_HDD_HTS547550A9E384_J2250055GMJ83C-part3  ONLINE       0     0     0
            ata-ST3500418AS_5VMQF6GN-part3                      ONLINE       0     0     0  (resilvering)
Mistake 2: zpool remove / zpool add instead of zpool attach
zpool remove and zpool add are for extending a pool’s capacity without redundancy — they are not mirror operations. zpool attach is what adds a disk to an existing mirror. Using the wrong command can silently break your mirror configuration.
The rule of thumb:
zpool replace— swap a failed disk for a new one (keeps mirror, starts resilver)zpool attach— add a new disk to an existing single-disk pool to create a mirrorzpool detach— remove a disk from a mirror (leaves single-disk pool — use with caution)zpool add— add storage capacity without redundancy (not for mirrors)
Mistake 3: Forgetting proxmox-boot-tool
ZFS resilvering and Proxmox boot tool are separate systems. After replacing a disk, the new disk’s EFI partition needs to be formatted and initialized with proxmox-boot-tool format and proxmox-boot-tool init — otherwise the new disk won’t boot if the old one fails. Always verify with proxmox-boot-tool status at the end.
A Note on Hardware
The Apple HDD that appears in the tanaka console sessions above is a salvaged drive from a dead Intel MacBook Pro. It behaves identically to any other SATA drive — the APPLE_HDD identifier is just the OEM label. Old hardware is old hardware; what matters is the SMART data and ZFS error counts, not the brand name on the label.
What’s Next
This procedure covers same-size drive replacement. If both drives in your mirror fail simultaneously — which can happen when a bad SATA cable or failing controller corrupts both sides before ZFS can self-heal — neither resilvering nor send/receive will save you. That scenario, and the full fresh-install recovery procedure that preserves your Ceph OSDs, is covered in Part 2.
If your replacement drives are smaller than the originals — which is common when migrating from old spinning rust HDDs to modern SSDs — ZFS won’t let you simply add the smaller drive to the mirror. The planned migration path, including a fresh install and UEFI upgrade, is covered in Part 3.
Related Articles
- Monitoring ZFS Boot Mirror Health in Proxmox 8 Clusters — SMART monitoring scripts and cluster health overview
- ProxMox 8.2 for the Homelabs — The original homelab setup article
- Proxmox & Ceph Homelab Guide — All my Proxmox and Ceph articles in one place