I want a place to test and try out new features and capabilities in Proxmox 8.2.2 SDN (Software Defined Networking). I would also like to be able to test some Ceph Cluster configuration changes that are risky as well. I do not want to do it on my semi-production Proxmox 8.2.2 Ceph enabled Cluster that I have mentioned in earlier posts. With 55TiB of raw storage and 29TiB of it loaded up with content, that would be painful to rebuild or reload if I made a mistake during my testing of SDN or Ceph capabilities.

Why I am doing this
Like I mention above, I need a place to test out Proxmox and not trash my semi-production cluster. Fortunately for me, Apalrd post on this Installing Proxmox VE 7 on Debian Bullseye that used an earlier Install Proxmox VE on Debian Buster document for his exploration is where I got the idea to create an extremely low-end Proxmox 8 cluster for any testing that I didn’t want on my main cluster.
Also fortunately, I happen to have an extra three (3) Dell Wyse 3040s that will eventually become a Wifi 6e Tailscale endpoint, or Home Assistant server, or an OpenWRT router from Recompiling OpenWrt to run natively on the 3040 but are currently sitting on my shelf in a shoebox. With just two nodes, I can test Proxmox HA but with three nodes, I can test Proxmox HA failover, add a Ceph Cluster, use CephFS share storage, and try the new SDN Datacenter features as well.
For an extra bit of fun, I added three (3) Amazon Basics USB 3.0 to 10/100/1000 Gigabit Ethernet Internet Adapter so I can have more than a single network interfaces to make testing more expansive and interesting. I also scrounged around and pulled out three old 8GB USB2 Thumbdrives from an old box to use as the Ceph OSD media and then found a three pack of SanDisk 32GB 3-Pack Ultra Fit USB 3.1 Flash Drive (3x32GB) for under $20 on Amazon to upgrade that Ceph storage and offers an opportunity to learn about transitioning between media in Ceph Clusters. I’d like to test moving an OSD that contains active data between nodes and recover it on the fly.
One area I will probably miss options for testing are the shared or passthru IOMMU devices. From the lspci results below, I might be able to do something with the iGPU and the Built-in NIC and we can maybe do something with a USB Device as seen in the lsusb results. The SDIO Controller on some of the units have a Wifi card. I’m not sure what I can do there but I’ll explore it later.
root@pve1:~# uname -a
Linux pve1 6.8.8-3-pve #1 SMP PREEMPT_DYNAMIC PMX 6.8.8-3 (2024-07-16T16:16Z) x86_64 GNU/Linux
root@pve1:~# lsb_release -a
No LSB modules are available.
Distributor ID: Debian
Description:    Debian GNU/Linux 12 (bookworm)
Release:        12
Codename:       bookworm
root@pve1:~# lscpu -e
CPU NODE SOCKET CORE L1d:L1i:L2 ONLINE    MAXMHZ   MINMHZ       MHZ
  0    0      0    0 0:0:0         yes 1920.0000 480.0000  899.3300
  1    0      0    1 2:2:0         yes 1920.0000 480.0000  650.6640
  2    0      0    2 4:4:1         yes 1920.0000 480.0000 1921.6100
  3    0      0    3 6:6:1         yes 1920.0000 480.0000 1920.0240
root@pve1:~# lspci -tvnn
-[0000:00]-+-00.0  Intel Corporation Atom/Celeron/Pentium Processor x5-E8000/J3xxx/N3xxx Series SoC Transaction Register [8086:2280]
           +-02.0  Intel Corporation Atom/Celeron/Pentium Processor x5-E8000/J3xxx/N3xxx Integrated Graphics Controller [8086:22b0]
           +-0b.0  Intel Corporation Atom/Celeron/Pentium Processor x5-E8000/J3xxx/N3xxx Series Power Management Controller [8086:22dc]
           +-11.0  Intel Corporation Atom/Celeron/Pentium Processor x5-E8000/J3xxx/N3xxx Series SDIO Controller [8086:2295]
           +-14.0  Intel Corporation Atom/Celeron/Pentium Processor x5-E8000/J3xxx/N3xxx Series USB xHCI Controller [8086:22b5]
           +-1a.0  Intel Corporation Atom/Celeron/Pentium Processor x5-E8000/J3xxx/N3xxx Series Trusted Execution Engine [8086:2298]
           +-1c.0-[01]----00.0  Realtek Semiconductor Co., Ltd. RTL8111/8168/8411 PCI Express Gigabit Ethernet Controller [10ec:8168]
           \-1f.0  Intel Corporation Atom/Celeron/Pentium Processor x5-E8000/J3xxx/N3xxx Series PCU [8086:229c]
root@pve1:~# lsusb -tv
/:  Bus 02.Port 1: Dev 1, Class=root_hub, Driver=xhci_hcd/6p, 5000M
    ID 1d6b:0003 Linux Foundation 3.0 root hub
/:  Bus 01.Port 1: Dev 1, Class=root_hub, Driver=xhci_hcd/7p, 480M
    ID 1d6b:0002 Linux Foundation 2.0 root hub
    |__ Port 1: Dev 2, If 0, Class=Mass Storage, Driver=usb-storage, 480M
        ID 8644:8005 Intenso GmbG
    |__ Port 3: Dev 3, If 0, Class=Communications, Driver=cdc_ncm, 480M
        ID 0b95:1790 ASIX Electronics Corp. AX88179 Gigabit Ethernet
    |__ Port 3: Dev 3, If 1, Class=CDC Data, Driver=cdc_ncm, 480M
        ID 0b95:1790 ASIX Electronics Corp. AX88179 Gigabit Ethernet
The Dell Wyse 3040 hardware specs of 2GB RAM, 8GB of eMMC storage, and 4-core Atom CPU are extremely limiting. The 2GB of RAM makes you think about every bit of additional CT/VM workload you are adding along with OS system services. The 6GB of available eMMC storage makes you consider each software package installed to the OS drive. So this makes the environment both frustrating and interesting at the same time. You really think about every bit of the system where on my main cluster I just install whatever and add however many CT or VM to a node.
Debian 12 on Wyse 3040
You will need to read the earlier post Debian 12 on Dell Wyse 3040s as this is were I started out for each of the Proxmox nodes for a base Debian 12 installation. You will need to fix the power down issue and have these units network capable and updated.
Proxmox 8.2.2 overlay on Debian 12.5.2
The Proxmox Documentation Wiki has a page called Install Proxmox VE on Debian 12 Bookworm that walks thru the steps to update a Debian 12 system to Proxmox 8. You should read and reference it when doing this process. It has more details on each step. I will note where the Dell Wyse 3040 has differences or minor issues I encountered as I run thru the steps I took to get my cluster running.
Debian 12 likes to setup a user account (mine is just mcgarrah) and a root account that is separate. Proxmox only creates a root account and configures everything to use it. You will need to fix OpenSSH to allow root access if you want it to reflect a Proxmox system install. I also use the sudo command extensively which is not a norm with Proxmox.
To get to a root session on a default Debian 12 setup, you can login remotely via the user account, then run su - and enter the root password. You will now be in a root session.
Update Debian 12
Update your Debian to the most current of all packages. This smooths out some rough edges later.
mcgarrah@pve1:~$ su -
Password: **********
root@pve1:~# apt update && apt full-upgrade -y
root@pve1:~# exit
mcgarrah@pve1:~$
Verify hosts file
Verify /etc/hosts has an IPv4 for hostname
mcgarrah@pve1:~$ hostname --ip-address
192.168.89.11
Update APT repositories
su -
echo "deb [arch=amd64] http://download.proxmox.com/debian/pve bookworm pve-no-subscription" > /etc/apt/sources.list.d/pve-install-repo.list
wget https://enterprise.proxmox.com/debian/proxmox-release-bookworm.gpg -O /etc/apt/trusted.gpg.d/proxmox-release-bookworm.gpg
sha512sum /etc/apt/trusted.gpg.d/proxmox-release-bookworm.gpg
apt update && apt full-upgrade -y
mcgarrah@pve1:~$ su -
Password: **********
root@pve1:~# echo "deb [arch=amd64] http://download.proxmox.com/debian/pve bookworm pve-no-subscription" > /etc/apt/sources.list.d/pve-install-repo.list
root@pve1:~# wget https://enterprise.proxmox.com/debian/proxmox-release-bookworm.gpg -O /etc/apt/trusted.gpg.d/proxmox-release-bookworm.gpg
--2024-07-16 23:29:06--  https://enterprise.proxmox.com/debian/proxmox-release-bookworm.gpg
Resolving enterprise.proxmox.com (enterprise.proxmox.com)... 144.217.225.162, 2a0b:7140:8:100::90
Connecting to enterprise.proxmox.com (enterprise.proxmox.com)|144.217.225.162|:443... connected.
HTTP request sent, awaiting response... 200 OK
Length: 1187 (1.2K) [application/octet-stream]
Saving to: ‘/etc/apt/trusted.gpg.d/proxmox-release-bookworm.gpg’
/etc/apt/trusted.gpg.d 100%[==========================>]   1.16K  --.-KB/s    in 0s
2024-07-16 23:29:07 (2.85 MB/s) - ‘/etc/apt/trusted.gpg.d/proxmox-release-bookworm.gpg’ saved [1187/1187]
root@pve1:~# sha512sum /etc/apt/trusted.gpg.d/proxmox-release-bookworm.gpg
7da6fe34168adc6e479327ba517796d4702fa2f8b4f0a9833f5ea6e6b48f6507a6da403a274fe201595edc86a84463d50383d07f64bdde2e3658108db7d6dc87  /etc/apt/trusted.gpg.d/proxmox-release-bookworm.gpg
root@pve1:~# apt update && apt full-upgrade -y
...
root@pve1:~# exit
mcgarrah@pve1:~$
Install Proxmox VE Kernel
We need to get the PVE kernel installed so we have the compiled flags and features necessary for PVE to run. We have to reboot after installing the kernel before installing the rest of the packages.
mcgarrah@pve1:~$ su -
Password: **********
root@pve1:~# apt install proxmox-default-kernel -y
...
root@pve1:~# systemctl reboot
Install Proxmox VE Packages
Become root and install the PVE packages recommended by PVE docs.
mcgarrah@pve1:~$ su -
Password: **********
root@pve1:~# apt install proxmox-ve postfix open-iscsi chrony -y
...
root@pve1:~# exit
mcgarrah@pve1:~$
During the install, I picked “Local Only” for Postfix and regretted it later. YMMV.
Later I found we were missing the ksmtuned, dnsmasq and FRR tools.
mcgarrah@pve1:~$ su -
Password: **********
root@pve1:~# apt install proxmox-ve frr-pythontools ksmtuned dnsmasq -y
...
root@pve1:~# exit
mcgarrah@pve1:~$
Adding ksmtuned enables Kernel Samepage Merging to help with memory utilization. Adding dnsmasq and FRR Tools are for DNS and routing support in SDN.
Remove Debian Kernel and OS-Prober
Reduce complexity and future issues by removing the default Debian Kernel from the PVE system. OS-Prober can conflict with VM hosts are worth removing early.
mcgarrah@pve1:~$ su -
Password: **********
root@pve1:~# apt remove linux-image-amd64 'linux-image-6.1*' os-prober -y
root@pve1:~# update-grub
...
root@pve1:~# systemctl reboot
I recommend rebooting after making major changes like this to verify that the correct kernel and boot works.
mcgarrah@pve1:~$ uname -a
Linux pve1 6.8.8-2-pve #1 SMP PREEMPT_DYNAMIC PMX 6.8.8-2 (2024-06-24T09:00Z) x86_64 GNU/Linux
When you come back up, you should see the PVE kernel 6.8 which is newer than the Debian default of 6.1.
Section of post updated 2024-08-26.
Following up after ProxMox 8.2.4 Upgrade on Dell Wyse 3040s where I needed some addtional work to clean the Debian Kernal Images.
First be very sure you are running the PVE kernel.
mcgarrah@pve1:~$ uname -a
Linux pve1 6.8.8-2-pve #1 SMP PREEMPT_DYNAMIC PMX 6.8.8-2 (2024-06-24T09:00Z) x86_64 GNU/Linux
Next purge the kernel image packages and not just remove them to really clean them out. This command will remove the meta-package and the individual linux images.
apt purge -y $(dpkg --list | grep -Ei 'linux-image|linux-headers' | awk '{print $2}' | grep -v "$(uname -r)" | sort -V)
Return to the original post.
Proxmox Helper Scripts
Proxmox VE Helper-Scripts are a great way to accelerate setting up and maintaining your Proxmox cluster.
“These scripts empower users to create a Linux container or virtual machine interactively, providing choices for both simple and advanced configurations. The basic setup adheres to default settings, while the advanced setup gives users the ability to customize these defaults. Options are displayed to users in a dialog box format. Once the user makes their selections, the script collects and validates their input to generate the final configuration for the container or virtual machine.”
PVE Post Install
Proxmox VE Post Install script will offer a set of prompts. Take the defaults except for the “Disabling high availability” if you intents to have a Proxmox Cluster or use Ceph. The rest of the defaults are good. Often the last step is for an upgrade of all packages and prompts about rebooting.
mcgarrah@pve1:~$ su -
Password: **********
root@pve1:~# bash -c "$(wget -qLO - https://github.com/tteck/Proxmox/raw/main/misc/post-pve-install.sh)"
    ____ _    ________   ____             __     ____           __        ____
   / __ \ |  / / ____/  / __ \____  _____/ /_   /  _/___  _____/ /_____ _/ / /
  / /_/ / | / / __/    / /_/ / __ \/ ___/ __/   / // __ \/ ___/ __/ __ `/ / /
 / ____/| |/ / /___   / ____/ /_/ (__  ) /_   _/ // / / (__  ) /_/ /_/ / / /
/_/     |___/_____/  /_/    \____/____/\__/  /___/_/ /_/____/\__/\__,_/_/_/

 ✓ Corrected Proxmox VE Sources
 ✓ Disabled 'pve-enterprise' repository
 ✓ Enabled 'pve-no-subscription' repository
 ✓ Corrected 'ceph package repositories'
 ✓ Added 'pvetest' repository
 ✓ Disabled subscription nag (Delete browser cache)
 ✗ Selected no to Disabling high availability
 ✓ Updated Proxmox VE
 ✓ Completed Post Install Routines
root@pve1:~# exit
mcgarrah@pve1:~$
PVE CPU Microcode Updates
Proxmox VE Processor Microcode script updates the low-level firmware for your CPU.
mcgarrah@pve1:~$ su -
Password: **********
root@pve1:~# bash -c "$(wget -qLO - https://github.com/tteck/Proxmox/raw/main/misc/microcode.sh)"

 ✓ GenuineIntel was detected
 ✓ Intel iucode-tool is already installed
 - Downloading the Intel Processor Microcode Package intel-microcode_3.20240531.1+nmu1_amd
 ✓ Downloaded the Intel Processor Microcode Package intel-microcode_3.20240531.1+nmu1_amd64.deb
 ✓ Installed intel-microcode_3.20240531.1+nmu1_amd64.deb
 ✓ Cleaned

In order to apply the changes, a system reboot will be necessary.
root@pve1:~# systemctl reboot
PVE Kernel Clean
Proxmox VE Kernel Clean scripts clears out old or unused kernels. It is worth using occasionally after you upgrade your system a few times.
Adding the sudo command and permissions. You have to logout of the session and log back in for the permissions to take effect.
mcgarrah@pve1:~$ su -
root@pve1:~# apt install sudo -y
root@pve1:~# usermod -aG sudo mcgarrah
root@pve1:~# exit
mcgarrah@pve1:~$ exit
Here are some tools I just install everywhere because they are useful. You can add them or not.
mcgarrah@pve1:~$ sudo apt install vim curl tmux -y
Here are several tools worth having for diagnosing issues with performance.
mcgarrah@pve1:~$ sudo apt install htop iftop iptraf dstat ioping iotop -y
Note: I removed the atop command later in my post ProxMox 8.2.4 Upgrade on Dell Wyse 3040s as it stores logs daily which ties up disk space I cannot afford on these small boxes. It is a great tool but not for these SFF systems.
Add these for grabbing information on the disk and cpu temperatures and other contents.
mcgarrah@pve1:~$ sudo apt install lm-sensors -y
mcgarrah@pve1:~$ sensors
coretemp-isa-0000
Adapter: ISA adapter
Core 0:       +52.0°C  (high = +90.0°C, crit = +90.0°C)
Core 1:       +52.0°C  (high = +90.0°C, crit = +90.0°C)
Core 2:       +55.0°C  (high = +90.0°C, crit = +90.0°C)
Core 3:       +55.0°C  (high = +90.0°C, crit = +90.0°C)

soc_dts0-virtual-0
Adapter: Virtual device
temp1:        +54.0°C

soc_dts1-virtual-0
Adapter: Virtual device
temp1:        +52.0°C

acpitz-acpi-0
Adapter: ACPI interface
temp1:         +0.0°C
Voilà
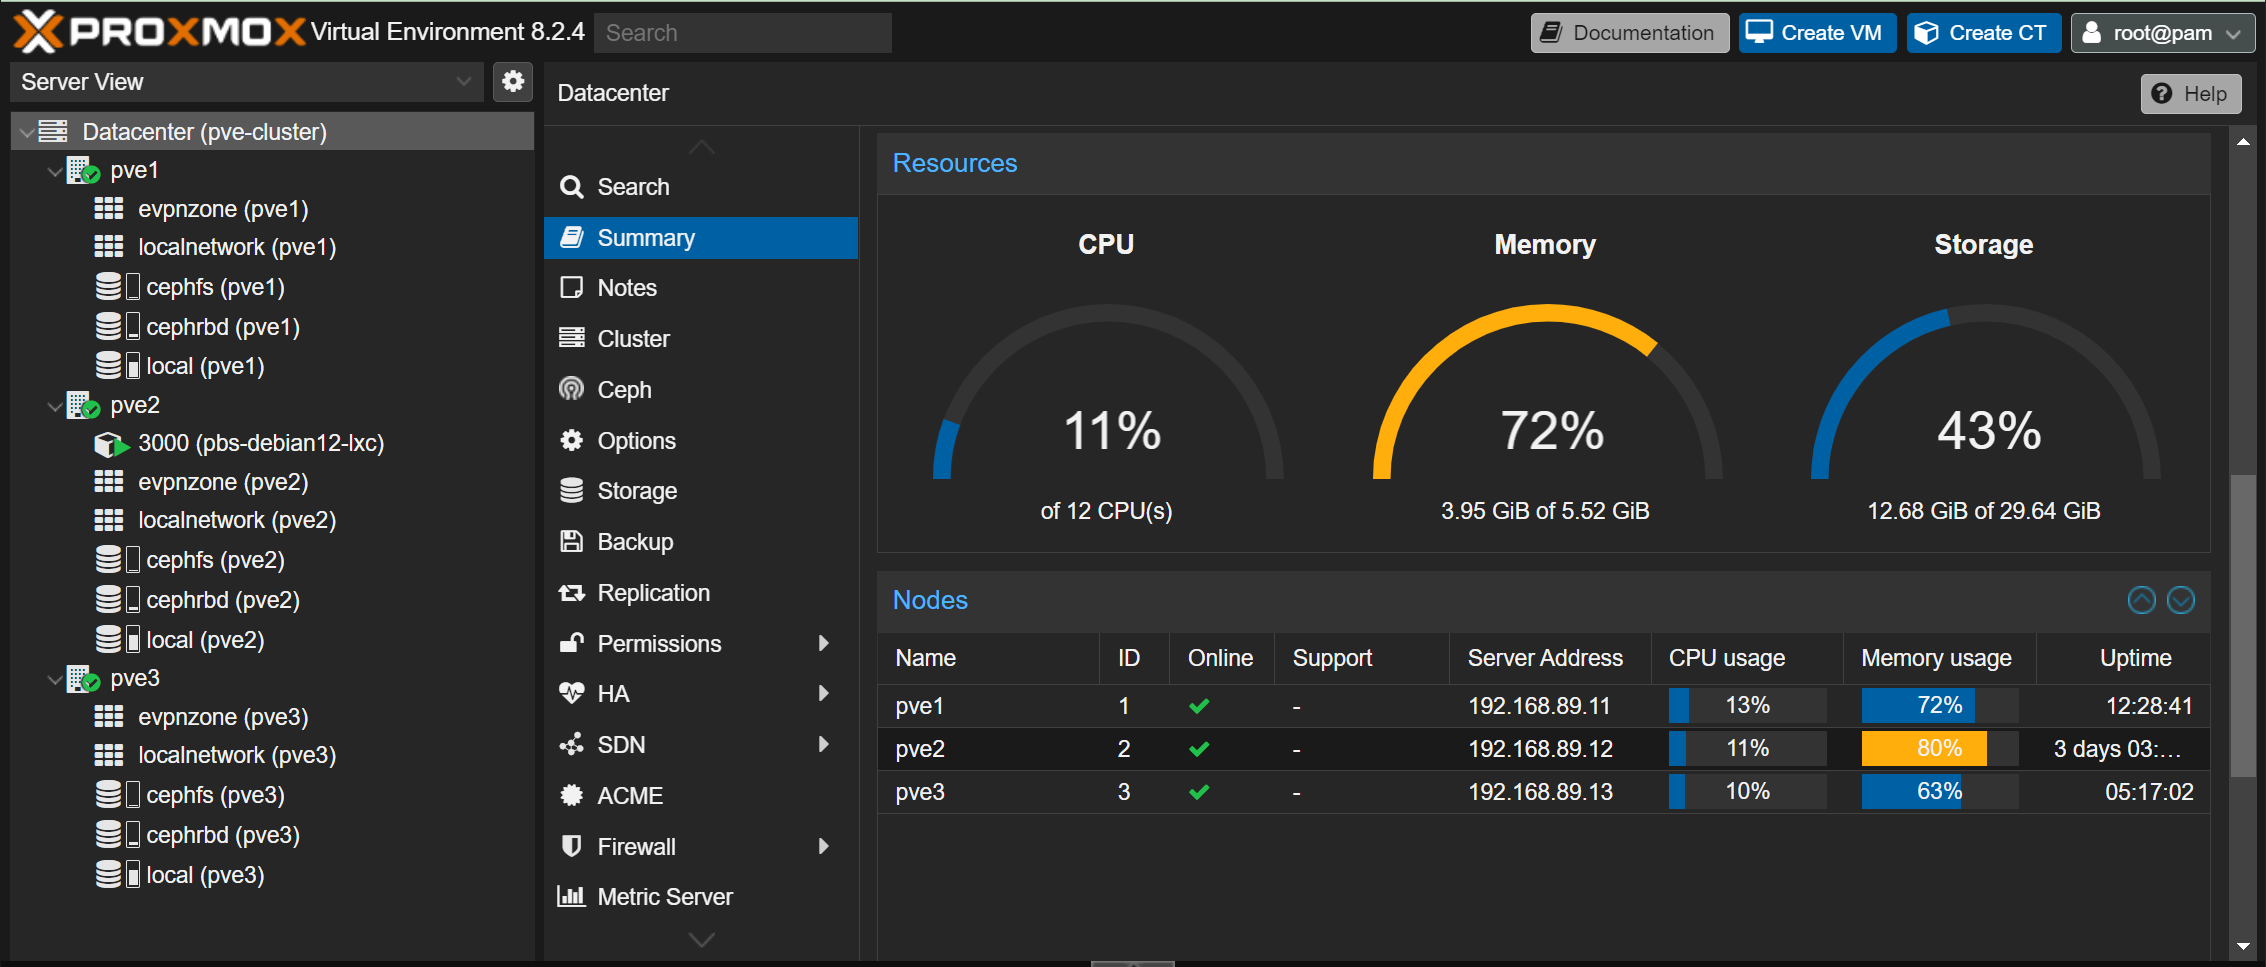
Above is a three node Proxmox 8 Cluster with Ceph and CephFS configured. A single Debian Container in a HA failover configuration that used Ceph RBD and CephFS for shared storage. The network is setup with two bridged networks on vmbr0 and vmbr1 for a LAN and SAN configuration with the Ceph Cluster using both. An overlay SDN network is configured but currently unused by the CT or future VM.
References
Here is a collection of posts and articles that helped me down this path.
ParkyTowers Thin Client site has the Wyse 3040 (N10D): Hardware which is beyond useful. A great place to look for other thin client hardware and other hacking on that hardware.
The series of posts on M0les - Thoughts that go “bump” in the night on the Wyse 3040 of from May, June, and August of 2023 have some excellent information and worth a read.
Install a New Linux OS On a Dell Wyse 3040 from Feb 2022 is an excellent article for starting out.
Apalrd’s posts on Installing Proxmox VE 7 on Debian Bullseye and Buying More Thin Clients for more ‘fun’? are what got me started on this idea when I watched his Youtube channel.
A Baby WYSE, the 3040 is an early look at these as a Raspberry Pi replacement.
I hope you find some of this helpful or at least interesting to read.